
Configure Ubiquiti Edge Router Lite with Preferential Load Balancing for different devices via dual link WAN
/Snappy title, huh?
Introduction and Purpose
In this article I give the steps to configure an Edge Router Lite so that it can apply different load balancing rules to different devices on your home/local network. There might be a few use cases for this type of configuration, but here's mine:
I live in a rural area with slow ADSL broadband (around 2Mbps) and no imminent prospect of fibre. I am also a home worker, and that speed is practically unworkable. Thankfully in December 2016, Vodafone expanded 4G coverage, such that I can now receive it via an aerial on my house. So, at the time of writing, I have a 50Gb per month data plan on 4G, and can get speeds of around 40Mbps. I need both links, because not only is their variability in the services, due to things like weather, but 50Gb is simply not enough. So, I need to split my traffic over the networks so that my work activity gets priority on the high speed link, and other stuff (such as music streaming) favour the slower - but uncapped - ADSL link.
Using the edge router, this configuration does exactly that. The inspiration and configuration schema itself was provided at https://community.ubnt.com/t5/EdgeMAX/Dual-WAN-with-some-hosts-using-only-one-WAN/m-p/703493#M22093 but without instructions. As a novice to networking, my eyes glaze over at all that config and the prospect of recreating it at the command line. So I set out to configure it via the UI (and succeeded). This article shows the steps.
Objectives
I have several media streaming devices in the house, e.g. SONOS, Amazon Echo Dot. The reality is, for playing music they do not need 4G speeds, and up until now have been unnecessarily consuming 4G data allowance on my existing load balancing set up. That set up is just one load balance group with a 75:25 split ADSL:4G, which in itself is not ideal because it favours the slow link, but is necessary to keep my 4G usage within the necessary limits. The SONOS in particular is a culprit because it is in my child's room and plays a playlist of about 3 hours' duration each night: it really doesn't need to use 4G at all (except perhaps for fail over) - so the plan is to "pin" that device to the ADSL link.
The same goes for the Amazon Echo Dot in my office, and the Echo Dot in our living area, which is hooked up to a soundbar.
The plan with the configuration is to have these 3 devices belong to their own load balance group, and balance that group so that it is almost 100% supplied by the ADSL link. In actual fact I am going to start off with 90-something percent, so that when the ADSL link is being heavily used (child watching iplayer for example), there is some availability of additional bandwidth from the 4G side. Failover will be left in place so that there are no interruptions in the event of ADSL failure (or me tripping over the hub).
Remaining devices, for now, will all belong to a different load balance group which is more equitable, allowing them a greater share of the 4G. I need to run the system for a while to establish the right level within my data cap, and indeed plan to introduce a further load balance group which tips the balance the other way; thus allowing, for example, my work PC to have a 90:10 balance 4G:ADSL. For the purposes of this article, however, all these remaining devices will stay in the default load balance group, which was created using the Edge Router wizard.
Part 1 - Static IP's
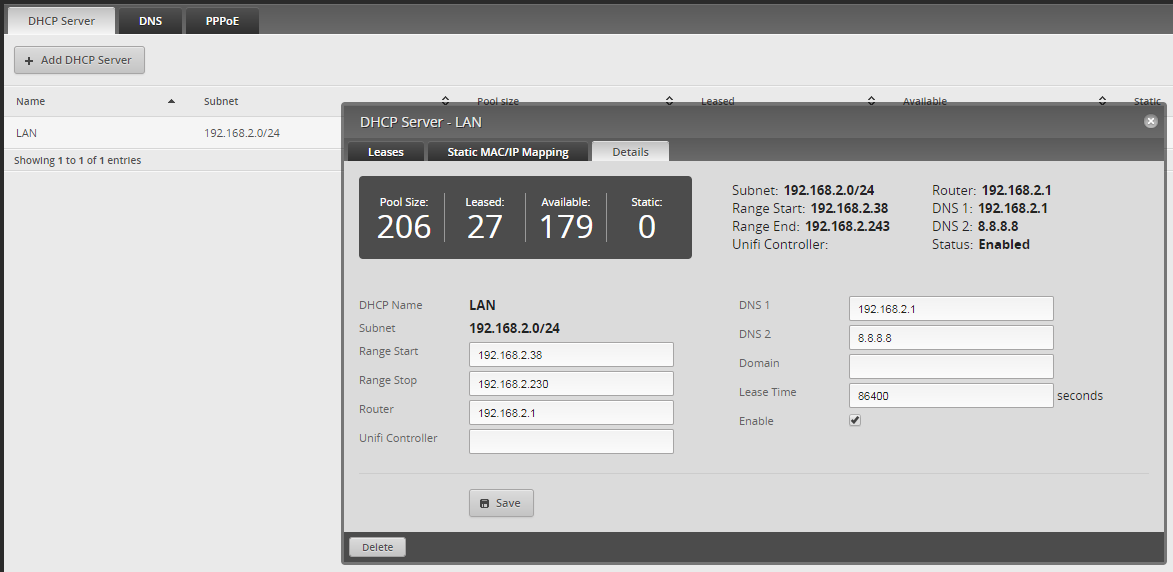
This whole set up relies on creating a group of devices you can assign to a load balance rule, and applying that rule to the firewall prior to the default rule. In order to create the group of devices, they need to have static IP's rather than the default dynamic. That way they can always be identified. Knowing that I plan to expand the number of devices that I might do this with, I decided to reserve a larger-than-default range of IP's for this exercise, and future use.
So, i reduced the existing dynamic IP range to stop at 192.168.2.230 on the basis I would reserve 192.168.2.231 - 239 for my "ADSL-pinned" devices. This can be done in the DHCP Server menu.
next step is to create the static mappings for the SONOS and Amazon Echo devices. One way to do this is from the DHCP Server -> Static MAC/IP mapping tab.


I have set my SONOS to the first address in my "reserved" static range: xxx.231
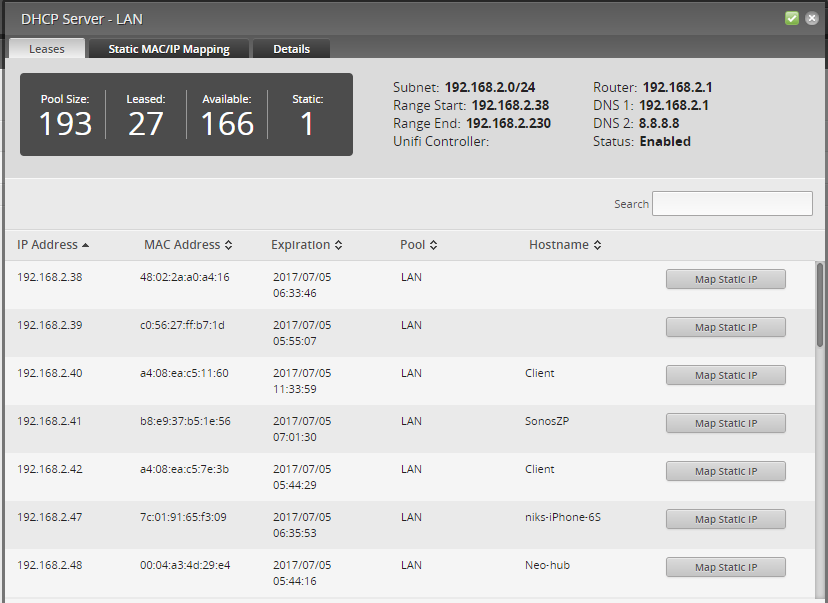
There's also another (quicker/easier) way to create these mappings: from the Leases screen. Just find your device in the list.
Note that I didn't change the name of anything, just the IP address to something in my static range. Note too, that the existing IP leases hold good even after this change, so the devices do not take on their new IP until you reboot them, which we can do at the end.
So, I mapped my Office Echo dot to static IP 192.168.2.232 and Kitchen dot to xxx.233

The above steps complete part 1, which accomplishes this configuration step of the original solution:
Part 2 - Firewall Group
Now we need an "Address Group" with those static addresses, as per the original solution:
This can be done from the Firewall/NAT controls - I created a group called A nice

A nice feature is the ability to add a range of IP's, not just individual devices (choose "Actions -> Config"). I chose to add the whole of my 192.168.2.23x range so that any device mapped into that static range in future will automatically adopt the ADSL load-balancing scheme.

Part 3 - Load Balancing rules
The original solution requires creation of an additional load balance rule:

So, to begin with, I am going to create a load balancing group, using a 90/10 rule, called LB-ASDL-primary. This can be done from the Config Tree pane. (Navigate to the branch shown in the bold breadcrumb trail, and choose ADD)

Since I am running on fairly default configuration, this new group just needs to mimic the existing master group (G), so that means adding the right interfaces (eth0 and eth1 in my case)
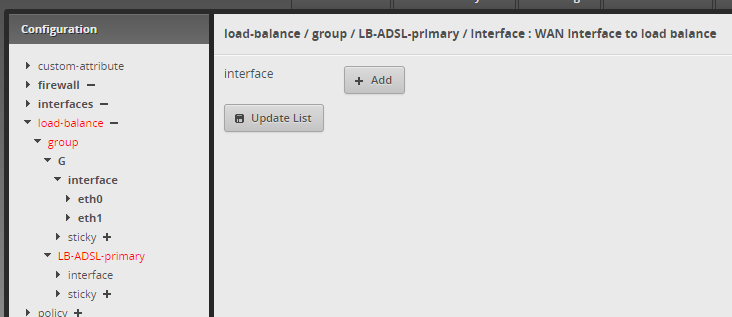
Once done, we need to work down the configuration for LB-ADSL-primary, replicating what we see in "G".

Again, if like me you are running on default config, in reality most settings can be left alone, and it's just the weight that needs amending. Once, that's done, click "PREVIEW" - which is essentially a "check and save" function - at the bottom of the screen.
With this configuration, my SONOS/Echo devices are still going to use 10% of the 4G link. It will be trivial at a later date to make it 100% ADSL and 0% 4G, and set the 4G as failover-only, if desired. That's this step done.
Part 4 - Amend Firewall "Modify" group
Referring back to the original solution - we need to change the firewall "modify" rule to add a new "modify" rule, which will reference our new load balance group. Thus our new group of devices will get their special load-balance treatment before the remaining devices get the default treatment.

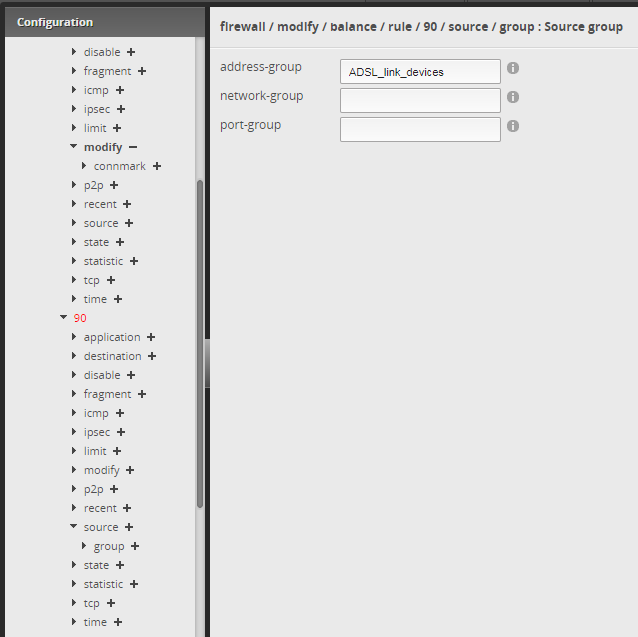
Note that in the new rule we have to reference our new load balance group and then also the devices (address group) that are the source. As a reminder:
- Our Firewall/Address group is called ADSL_link_devices
- Our Load balance rule is called: LB-ADSL-primary
In the config tree (see below), the existing config built by the wizard looks like this, with rule 100 set as the load balancing rule, and the default load balancing group called "G".

We will add a new rule and reference to the group. It will be before rule 100, and use our new load balance group, and assign our new address group (i.e. target devices) to it.
Add a rule 90, then change the "source" to reference the new address group.
Now we need to define the actual rule. It's a "modify" rule, so navigate to the modify branch under rule 90, then reference our new load balance group in the lb-group slot.

And Save ("Preview")

That's this step done.
Finally - Apply to Interface
A firewall rule is nothing unless it is actually applied to an interface, as per the original solution:

As you might have suspected, following this method you don't have to perform this step, because we have modified the existing rules "live" (called "balance" by default) and all our changes are already in place on the interface they originally applied to (eth2 in my case). (shown below for completeness)

Testing
Before we change anything else or try our devices, check what is currently happening: our new group has no traffic (as we expect)

Now we play something on the SONOS / Amazon Echo, to see which WAN link the media comes down. Since the IP addresses of the devices have not yet changed, nothing new happens, and (happily for this test) the data comes over the 4G link (eth1): exactly what I am trying to prevent.

And another check from the command line (i did sneakily change the weightings to 91/9 in the meantime, for those with a beady eye).

Now we reboot the devices so that they acquire their new static IP's. (Seems you can't ask Alexa just to reboot, which is a shame :) ). We can confirm that the devices (e.g. Echo) have picked up their new IP in the .23x range, which they have:

So,let's play some music again and re-examine the interfaces. Look at all that lovely red = eth0 = ADSL... just what I wanted.

And finally, confirm the stats from the command line, we see LB-ADSL-primary load balance group is now pulling data in the right proportions:

Very happy. Case closed!